Tilesheets.js helps you handling tile sheets with
JavaScript.
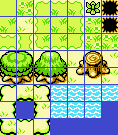
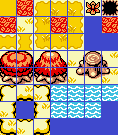
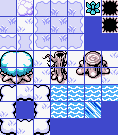
A tile sheet is a big image containing multiple smaller ones. In next
demos, we'll use these tile sheets:
Tilesheets.js helps you handling tile sheets with
JavaScript.
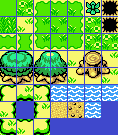
A tile sheet is a big image containing multiple smaller ones. In next
demos, we'll use these tile sheets:
Tilesheet class is the main concept of
Tilesheet.js. It needs a path to the image and sizes
information:
import { Tilesheet } from 'tilesheets';

const sheetSpring = new Tilesheet('./images/spring.png');
sheetSpring
    .setTileSize(16) // Tiles on the sheet are 16px*16px
    .setMargin(1);   // There is a 1px gap between each tile
A tilesheet must wait for its image to be loaded. To do that, simply
wait for promise waitForLoading:
await sheetSpring.waitForLoading();
// It's safe to use the sheet now!
When loaded, the sheet can be used! Three methods are provided according to your needs:
getTileRect: return rectangle representation of the
given tile (a JSON object with properties width,
height, x and y);
getTileStyle: use above method to return CSS style to
perform on a DOM element to display given tile;
getTileDomElement: use above methods to return a
span element displaying given tile.
These methods just need the index of the tile to get. Index start from 0, from the top left tile:
For example, if we want to render a bush:
await sheetSpring.waitForLoading();
const bushTile = sheetSpring.getTileDomElement(5);
document.body.appendChild(bushTile);Speaking about resizing: in order to keep the pixelated render of tiles, you can use the following CSS rules (thanks StackOverflow!):
body {
    image-rendering: optimizeSpeed;             /* STOP SMOOTHING, GIVE ME SPEED  */
    image-rendering: -moz-crisp-edges;          /* Firefox                        */
    image-rendering: -o-crisp-edges;            /* Opera                          */
    image-rendering: -webkit-optimize-contrast; /* Chrome (and eventually Safari) */
    image-rendering: pixelated;                 /* Chrome                         */
    image-rendering: optimize-contrast;         /* CSS3 Proposed                  */
    -ms-interpolation-mode: nearest-neighbor;
}An animation is the combination of an array of tile indexes and a speed, in milliseconds. An optional name can be provided:
const waterAnimation = {
    tiles: [38, 39, 40, 41],
    speed: 300,
    name: 'water',
};

const flowerAnimation = {
    tiles: [1, 12, 19, 20],
    speed: 300,
    name: 'flower',
};

sheetSpring.setAnimations([waterAnimation, flowerAnimation]);
Animations can be used only within a canvas element, via
the classes Sprite and Scene.
A sprite is an object manipulating tiles, displaying them one by one
in a canvas element.
import { Sprite, Tilesheet } from 'tilesheets';

const sheetSpring = new Tilesheet('./images/spring.png');
sheetSpring.setTileSize(16).setMargin(1);

const myCanvas = document.getElementById('my-canvas');

// Be sure that the sheet is loaded
springSheet.waitForLoading().then(() => {
    // Create a new sprite from a canvas
    const mySprite = new Sprite(myCanvas);

    mySprite
        .useTilesheet(sheetSpring)  // Tell the sprite to use the spring sheet
        .setCurrentTile(5)          // Set current tile to 5 (the bush one)
        .render();                  // And render it!
});
Of course, we can specify another tilesheet for the same sprite, we
just have to call useTilesheet with the
Tilesheet object we want to use, for example the one from
fall:
Interesting thing about sprites is that they can use their tilesheet animations, by their name:
mySprite
    .playAnimation('flower')
.render();It's of course possible to switch animation of the sprite on the fly, or simply stop it:
function switchAnimation(newAnimation) {
    const possibleAnimations = ['water', 'flower'];

    if (possibleAnimations.indexOf(newAnimation) >= 0) {
        mySprite.playAnimation(newAnimation).render();
    } else {
        mySprite.stopAnimation();
    }
}

//    ...
//    Rest of the code where we attach `switchAnimation` on buttons click handlers.
//    Check GitHub repository for full code!
// ...Even if the examples show some flowers and water, sprites are great to animate objects like characters, vehicles or monsters.
If we want to display and animate decors, it would be better to use a scene.
A scene is composed of multiple arrays of tiles. Each of these tiles
is rendered into a canvas element, by using a specific
Tilesheet object.
import { Scene, Tilesheet } from 'tilesheets';

const sheetSpring = new Tilesheet('./images/spring.png');
sheetSpring.setTileSize(16).setMargin(1);

const myCanvas = document.getElementById('my-canvas');

// Be sure that the sheet is loaded
springSheet.waitForLoading().then(() => {
    // Define wich tiles to render, by their index
    const myScene = new Scene([
        [21, 22, 23, 24,  9],
        [28, 29, 30, 31,  9],
        [22,  5,  3,  6, 10],
        [29,  5, 17, 17, 18],
    ], myCanvas);

    myScene
        .useTilesheet(sheetSpring)  // Tell the scene to use the spring sheet
        .render();                  // And render it!
});
Like sprites, we can define another tilesheet for the same scene,
again thanks to the method useTilesheet. What if winter
is coming?
When using sprites, we have to manually tell which animation to play, via its name. It's way simpler with scenes!
If a scene uses a tile defined in an animation, this tile will be automatically animated:
const tiles = [
    [ 1,  1,  1,  1,  1],
    [17, 17, 17, 17, 17],
    [36, 36, 36, 36, 36],
    [38, 38, 38, 38, 38],
];

const animatedSceneCanvas = document.getElementById('my-canvas');
const myAnimatedScene = new Scene(tiles, animatedSceneCanvas);

myAnimatedScene
    .useTilesheet(sheetSpring)
    .render();
By combining methods resetTiles(),
useTilesheet() and render(), we can create
dynamic scenes by switching the tilesheet to use on the fly:
const tiles = [
    [28, 29, 28, 29, 21, 22, 28, 29, 21, 22, 21, 22, 28, 29,  0,  0, 11, 42, 47, 47],
    [ 8, 25, 26, 27, 28, 29,  5,  5, 28, 29, 28, 29,  5,  5,  5,  6,  5, 42, 47, 47],
    [ 4, 32, 33, 34, 21, 22,  8,  8,  2,  3,  4, 21, 22, 17, 13,  5,  5, 42, 47, 47],
    [17, 14, 14, 14, 28, 29,  8,  8,  9, 10,  7, 28, 29, 36, 36, 36, 36, 51, 47, 47],
    [21, 22, 23, 24, 13, 13,  3,  3, 10, 10,  0, 11, 42, 38, 38, 38, 47, 47, 47, 47],
    [28, 29, 30, 31, 13, 21, 22,  6,  1, 10,  0, 11, 42, 38, 38, 38, 47, 47, 47, 47],
    [22,  2,  3,  3,  7, 28, 29,  6,  1,  7,  7, 18, 42, 45, 46, 45, 35, 50, 50, 50],
    [29, 16,  7,  7,  0,  1,  1, 21, 22, 21, 22,  8, 42, 45, 45, 46, 44,  8,  8,  8],
    [21, 22,  9,  0,  0,  0,  7, 28, 29, 28, 29, 21, 22, 50, 50, 50,  8,  2,  3,  3],
];

function switchSeason(season) {
    const seasonToTilesheet = {
        spring: sheetSpring,
        summer: sheetSummer,
        fall: sheetFall,
        winter: sheetWinter,
    };

    scene
        .resetTiles()   // Reset back scene tiles to the initial ones (useful for animated tiles)
        .useTilesheet(seasonToTilesheet[season]) // Use new tilesheet
        .render();                               // Re-render!
}

//    ...
//    Rest of the code where we attach `switchSeason` on buttons click handlers.
//    Check GitHub repository for full code!
// ...By default, sprites render directly the image of the tilesheet they're using, without any changes on it. It's possible to use other palettes than the default one, in order to dynamically switch colors of the sprites.
For this section, we'll use this tilesheet containing two tiles of Yoshi:

As we've seen before, it's quite easy to render these tiles via an animated sprite:
yoshiSprite
    .useTilesheet(sheetYoshi)   // Use the main sheet with Yoshi tiles
    .playAnimation('hourray');  // Play the hourray animation
As you may know, there are a lot of different Yoshi colors... We don't
really want to make our tilesheet bigger by adding new tiles on it, so
how can we display a yellow Yoshi?
By using palettes!
First we have to define the reference palette of the Yoshi tilesheet. It's simply another tilesheet loading an image which contains only colors. For our example, the image of the palette is this one:

This image will be loaded as a tilesheet:
const sheetGreenYoshiPalette = new Tilesheet('./images/green_yoshi_palette.png');
sheetGreenYoshiPalette.setTileSize(5).setMargin(0);
Then, we can tell the tilesheet with Yoshi to use the palette of this new tilesheet as a reference:
sheetYoshi.setReferencePalette(sheetGreenYoshiPalette.getReferencePalette());This operation allows Tilesheets.js to know how to handle and link colors. When done, we can create new palettes and use them!
Let's say we have this palette image:

We can define this image as a palette, like we've done before for the reference one:
const sheetYellowYoshiPalette = new Tilesheet('./images/yellow_yoshi_palette.png');
sheetYellowYoshiPalette.setTileSize(5).setMargin(0);

const yellowYoshiPalette = sheetYellowYoshiPalette.getReferencePalette();
Now that the palette is defined, we can tell the sprite to use it:
yoshiSprite
    .useTilesheet(sheetYoshi)       // Use the main sheet with Yoshi tiles
    .usePalette(yellowYoshiPalette) // Use the yellow palette we've just defined
.playAnimation('hourray'); // Play the hourray animationPalettes are a powerful tool to color-swap sprites without having to draw them enterly in a PNG file. Simply define a new palette file and you're done!
It's of course possible to switch palettes on the fly, by calling the
method usePalette() when we want to, as shown in the
below example: